
One of the best tools in Photoshop is the History Panel. I cannot work without it, so I created this tutorial hoping someone will find it useful. I think that everyone that works with Photoshop should be aware of it and know how to work with it properly. It can save you hours of work.
In Photoshop, you can easily undo your last actions by going to:
1. Edit -> Undo or Command+Z (Mac) / Ctrl+Z (PC). This will allow you to undo your last step.
2. Edit -> Step Backward or Option+Command+Z (Mac) / Alt+Ctrl+Z (PC). Allows you to go further backward.
By default, Photoshop lists the previous 20 states, and deletes the older steps in order to free more memory. To change the History States go to Photoshop Preferences -> Performance. A good number would be between 1-200, depending on your computer and its performance.

By working with the History Panel, you can see all the steps you took to get to a final image, and go back over several actions at once to any recent state of the image.*You should note that this History information is available in the History palette only during the current working session.
To open up the History Panel go to Window -> History.
Linear History
 Each time you make a change to an image, the state will be added to the bottom of the list as the most recently performed action. If you select one of the states, the image will revert to how it looked like at that state. You will notice that by selecing a previous state, the states below are still visible but highlighted in light gray. You can go forward or backward and see how your image looks like at different stages, but if you now make a change to the image, the states below will be automatically deleted, and once a History Step is removed, it cannot be retrieved.
By default, Photoshop is set up to work on Linear History.
Non-Linear History
 The advantage of working with the Non-Linear History lies in the fact that ALL the changes you make to an image will be available to you in the palette, and nothing is deleted. If you go back to a previous state and make changes to your file, the new step will be added at the bottom of the list, while preserving the other actions as well.
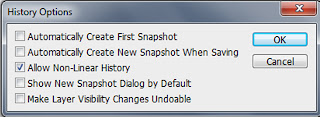
To allow for Non-Linear History open up the History Panel in the corner of the History Palette and select History Options. In the pop-up window select “Allow for Non-Linear History”.
Snapshot
 If you know you’re going to work on a big project and have a lot of states that you want to be able to see, but you do not want the History to affect your file size or the Photoshop performance, a good idea is to do snapshots that allow you to go backward at any state in time when you did those snapshots.
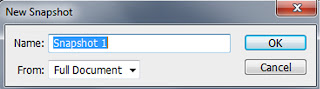
When you open a document, Photoshop will generate a first snapshot representing the original state of the image. You can create a snapshot every time you make a major change to your file, and go back to that state at any time. By creating multiple snapshots, you can also compare different actions applied to your image.
To create a new snapshot go to the History Panel -> New Snapshot and type a name for it.
History Log
You might want to remember the steps you took to get to a final image, either so you can apply those steps to another image, or to share them with someone. While the History Palette allows you to see all the steps you have done to an image, you cannot see all the details for each action, and once you close the document, the history is cleared. The History Log allows you to to record all your steps you took to get to the final image.
Before you start working on an image go to Preferences -> General and select the History Log checkbox. Log items can be saved to the image Metadata, to a separate text file or both. If you choose text or both, you will have to name the text file and choose a location for it. From the Edit Log Items dropdown list select Detailed, as this option will record all your actions with all the settings.
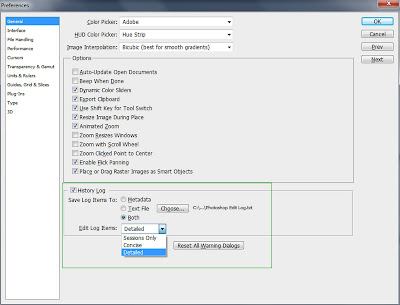
If you chose to record the data in a text file, you can later open it with a word processor or text editor. If you chose Metadata or both, to view the History Log Metadata you can use Adobe Bridge or the File Info dialog box File > File Info > History and you can read details on the changes you made.
Resources:
“Work with the History panel.” Web. < http://tinyurl.com/6eko9pl >.
“How To Keep A Log Of Your Work In Photoshop.” Web. < http://tinyurl.com/3q2uo7r >.
In Photoshop, you can easily undo your last actions by going to:
1. Edit -> Undo or Command+Z (Mac) / Ctrl+Z (PC). This will allow you to undo your last step.
2. Edit -> Step Backward or Option+Command+Z (Mac) / Alt+Ctrl+Z (PC). Allows you to go further backward.
By default, Photoshop lists the previous 20 states, and deletes the older steps in order to free more memory. To change the History States go to Photoshop Preferences -> Performance. A good number would be between 1-200, depending on your computer and its performance.

By working with the History Panel, you can see all the steps you took to get to a final image, and go back over several actions at once to any recent state of the image.*You should note that this History information is available in the History palette only during the current working session.
To open up the History Panel go to Window -> History.
Linear History

By default, Photoshop is set up to work on Linear History.
Non-Linear History
 The advantage of working with the Non-Linear History lies in the fact that ALL the changes you make to an image will be available to you in the palette, and nothing is deleted. If you go back to a previous state and make changes to your file, the new step will be added at the bottom of the list, while preserving the other actions as well.
 To allow for Non-Linear History open up the History Panel in the corner of the History Palette and select History Options. In the pop-up window select “Allow for Non-Linear History”.
Snapshot
 If you know you’re going to work on a big project and have a lot of states that you want to be able to see, but you do not want the History to affect your file size or the Photoshop performance, a good idea is to do snapshots that allow you to go backward at any state in time when you did those snapshots.
 When you open a document, Photoshop will generate a first snapshot representing the original state of the image. You can create a snapshot every time you make a major change to your file, and go back to that state at any time. By creating multiple snapshots, you can also compare different actions applied to your image.
To create a new snapshot go to the History Panel -> New Snapshot and type a name for it.
History Log
You might want to remember the steps you took to get to a final image, either so you can apply those steps to another image, or to share them with someone. While the History Palette allows you to see all the steps you have done to an image, you cannot see all the details for each action, and once you close the document, the history is cleared. The History Log allows you to to record all your steps you took to get to the final image.
Before you start working on an image go to Preferences -> General and select the History Log checkbox. Log items can be saved to the image Metadata, to a separate text file or both. If you choose text or both, you will have to name the text file and choose a location for it. From the Edit Log Items dropdown list select Detailed, as this option will record all your actions with all the settings.

If you chose to record the data in a text file, you can later open it with a word processor or text editor. If you chose Metadata or both, to view the History Log Metadata you can use Adobe Bridge or the File Info dialog box File > File Info > History and you can read details on the changes you made.
Resources:
“Work with the History panel.” Web. < http://tinyurl.com/6eko9pl >.
“How To Keep A Log Of Your Work In Photoshop.” Web. < http://tinyurl.com/3q2uo7r >.
No comments:
Post a Comment